Setting up a MixPre for Zoom Conferencing and Webinars
Great quality, clear-sounding audio is essential for effective video conferencing. While the built-in microphones and loudspeakers on computers, tablets, and mobile phones are acceptable for short conversations, professional results require dedicated audio hardware. When audio quality is poor, guests and participants fatigue and your message gets lost. Good video quality doesn’t make up for bad audio.
This guide will highlight best practices to achieve quality audio for Zoom conference and webinar participants using the Sound Devices MixPre Series. It assumes basic operating knowledge of the MixPre.
The Two Bus Method
While there are numerous ways to use a MixPre for effective conferencing, the setup below uses the MixPre’s two separate (stereo) output buses. The advantage of the Two Bus Method is its flexibility for the Zoom participant to monitor and record both sides of the conversation and the ability to apply output delay to local audio sent to the Zoom session (see Best Practices for Videoconferencing on a MixPre on delay).
The two buses are:
- LR Master Bus – this is the main stereo bus of the MixPre. In this setup it is used for headphone monitoring and recording of both local audio and the received remote session audio.
- St. L/R Output – the two-channel Left/Right outputs can function as a bus. Here we will assign ONLY local audio sources to this bus. This bus will then be sent to the USB Output and out to the Zoom session. Sending only the local audio sources prevents an echo path from being created. Note that the MixPre factory default assigns the LR Master Bus to this output; this will be changed.
The steps below will configure the MixPre for the Two Bus Method.
1. Enter Advanced Mode
Set the MixPre to Advanced mode from Menu Button > System > Mode > Advanced. Remember the menu button is the three lines in the upper right corner.
2. Set Up Local Audio Sources
Connect and set up microphones. Navigate to the Channel Screen of any local microphone source to set phantom power, high pass filter, and gain as needed. Press the input knob to access the Channel Screen.
3. Route USB Audio from the Zoom Session
Select two channels, typically the last two channels on the MixPre, and set their source to USB 1 and USB 2. Zoom audio appears on both USB In 1 and USB In 2 in stereo or mono. This will also allow stereo monitoring of the computer when these are stereo linked or hard panned left and right, respectively. To navigate to the channel screen for inputs 5&6 on a MixPre-6 II go to Menu Button > Inputs > Ch 5 Screen and Menu Button > Inputs > Ch 5 Screen.
4. Route Local Audio Channels to the St. Output Buses
This is an important step. In Menu Button > Outputs> St. Left Output and St. Right Output select ONLY channels with local audio sources, post-fader. Do not route any channels that contain USB audio to St. L Output or St. R Output.
5. Route USB Outputs
In Menu Button > Outputs > USB 1, select Out L as the source.
In Menu Button > Outputs > USB 2 select Out R as the source. Only USB Output 1 and USB Output 2 are needed for Zoom.
6. Ensure All Other USB Outputs Have No Source Selected
The MixPre factory default (v7.10) routes the mix tracks to the last two USB outputs. Remove that assignment. Keeping the factory default will cause an echo when the MixPre is connected to a Mac OS computer.
Zoom Settings
In recent versions of the desktop Zoom application many new audio-related controls have been introduced. The screenshots are from version 5.4 6 in MacOS.
The most important setting in Zoom to achieve high-quality audio is to turn on “Original Audio”. When Original Audio is active Zoom turns off its built-in echo cancellation and noise reduction algorithms. These algorithms are relatively heavy-handed and impact audio quality and interactivity.
- Select the MixPre for audio input and output.

- Enable “Use Original Sound” and turn off echo cancellation, turn on high fidelity audio, and, if sending stereo, enable stereo.

- When the session is active Enable Original Sound.

Windows Setup Tips
- No ASIO – When using the MixPre for Zoom in Windows, do not install the available ASIO drivers. The MixPre will appear as a USB audio class-compliant two-channel audio device in Windows 10 just by connecting it. Use ASIO drivers when the MixPre is used in multi-channel audio DAW software.
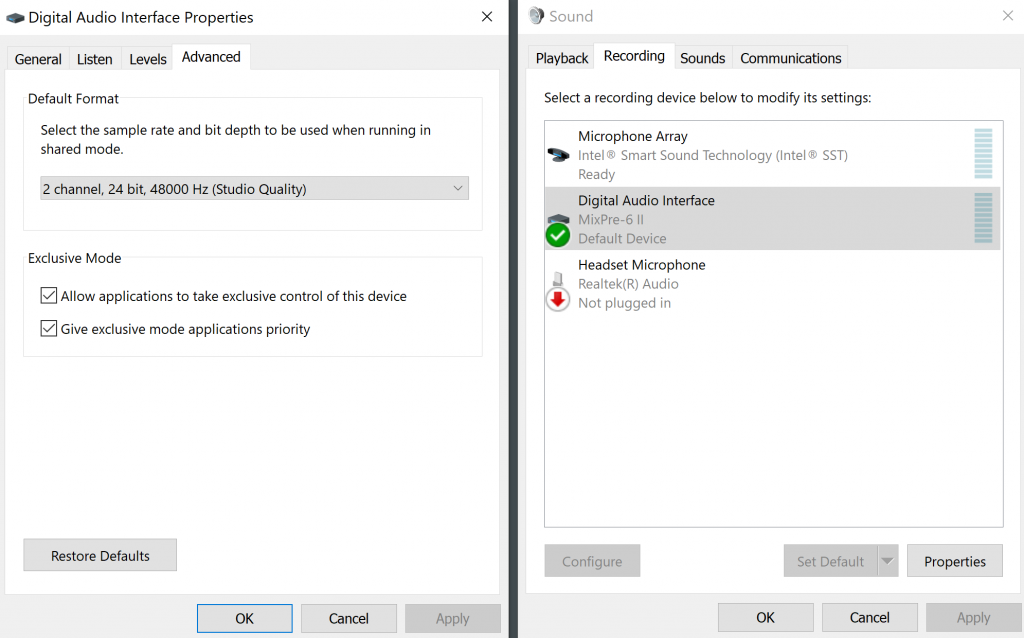
- Match Input and Output Sampling Rate – Make certain that the bit depth and sampling rate for recording and playback in Windows are set to the identical values. If these are set differently audio clicks may be introduced into either the Zoom audio or in the MixPre headphones.


- Set MixPre as the default audio device for Zoom.

MacOS Setup Tips
The MixPre’s Core Audio driver in MacOS allows for a great deal of flexibility. In the Audio MIDI Setup.app the MixPre can be set to be either a two-channel or multi-channel audio interface. When using the Two Bus Method of connection with Zoom only the first two USB channels for both input and output are used, so the MixPre can be set for any number of channels of input and output without affecting operation in Zoom.
Here a MixPre-6 II is set for all eight of the MixPre USB Outputs (USB inputs to the computer) to be active in MacOS.

Here a MixPre-6 II is set for all four of its USB Inputs (USB outputs from the computer) to be active in MacOS.

It is important to understand terminology. The computer’s USB outputs, or playback, are USB inputs on the MixPre. Likewise, USB inputs into the computer come from USB outputs on the MixPre.


