Configuring AstralComm

AstralComm’ is a proprietary protocol specifically designed to trigger DiGiCo console macros from Sound Devices Astral series devices. Astral transmitters, Astral HH, Astral TX paired with the Astral ARX16 or Astral ARX32 receivers can send macro commands over a network to one or more registered DiGiCo consoles to trigger their local macros.
Equipment Requirements
- DiGiCo SD or Quantum series consoles running firmware v20 or later
- Astral ARX16 or Astral ARX32 running firmware V8.1 or later
- Astral Series Transmitter to trigger the command
- Astral TX with the optional Astral TX Switch
- Astral HH with the optional Control1 (single button), Control3 (3 button), or Switch Ring (slider switch) control rings.
Setup
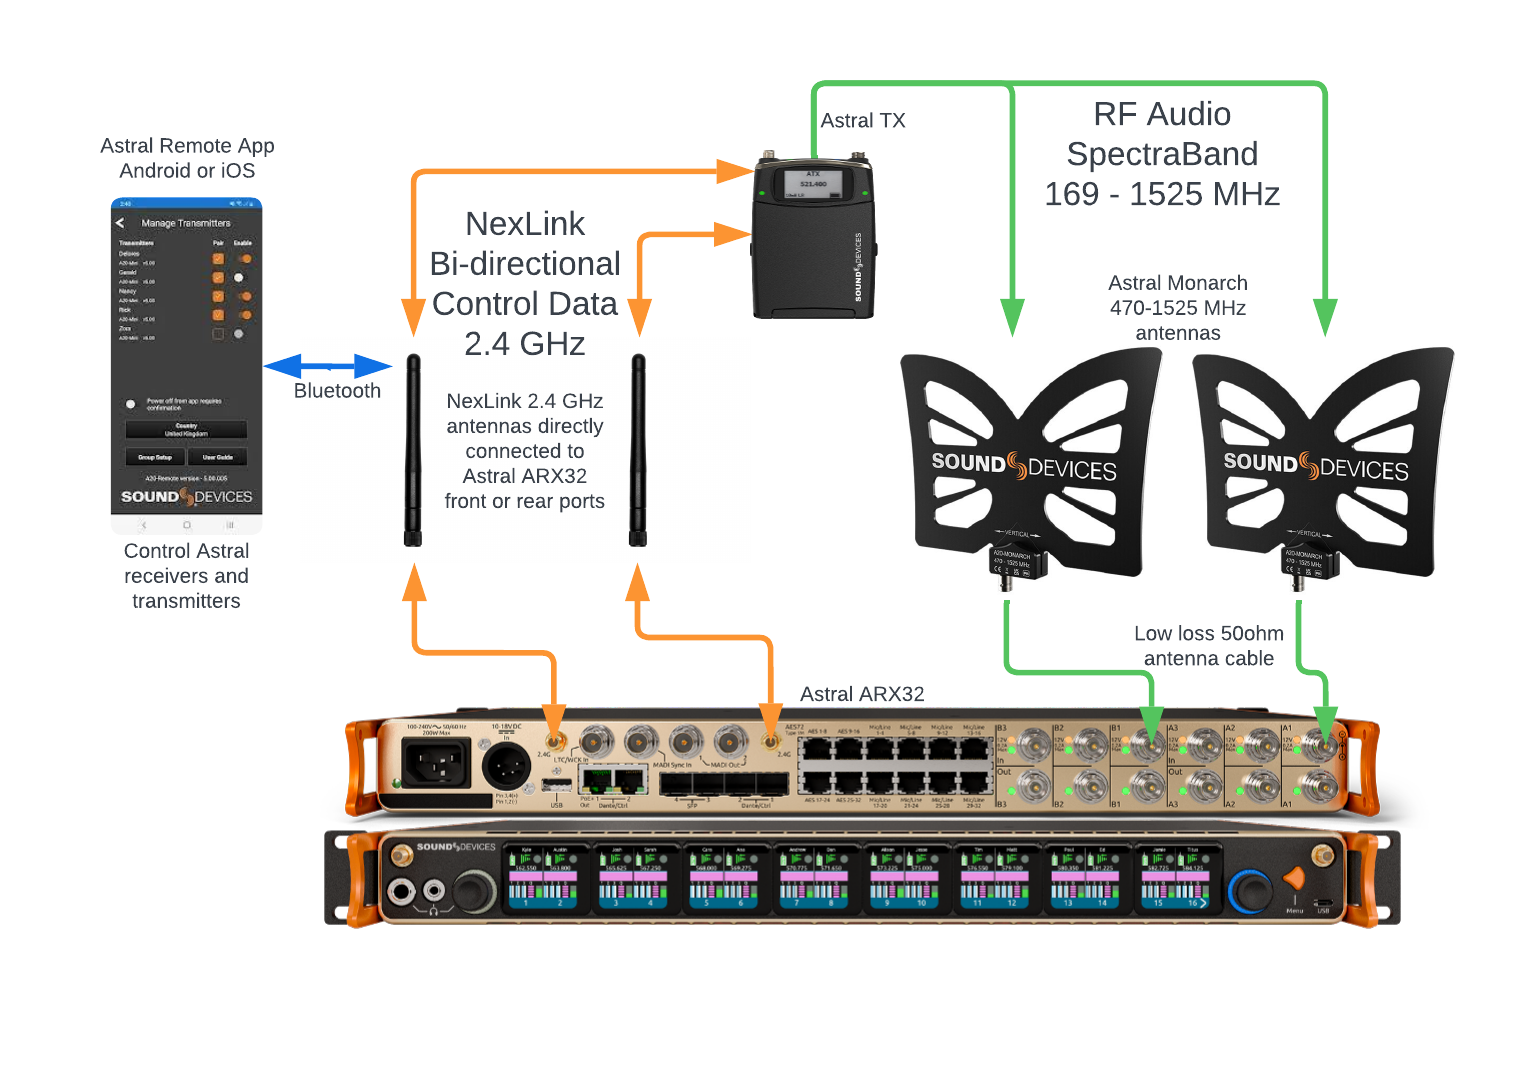
1. The first step to establish network communication between the Astral ARX16/ARX32 and a Quantum or SD DiGiCo console is to connect a network cable between the Astral Series receiver’s network control port and the DiGiCo’s network port. Network switches can be used when connecting multiple devices in the network control network.
2. Next, identify both the Astral Series receiver and the console’s control IP address.
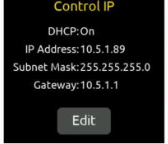
- From the Main Menu of the Astral Series receiver, enter the Network Menu and document the IP address of the Control IP. In this example, the Control IP address is 10.5.1.89 .
- From the Main Menu of the Astral Series receiver, enter the Network Menu and document the IP address of the Control IP. In this example, the Control IP address is 10.5.1.89
- From the Master Screen of the DiGiCo console, navigate to Setup > External Control. Note the Console IP address, which is located at the bottom of the External Control window. In this example, we will use a console IP address of 10.5.1.222.
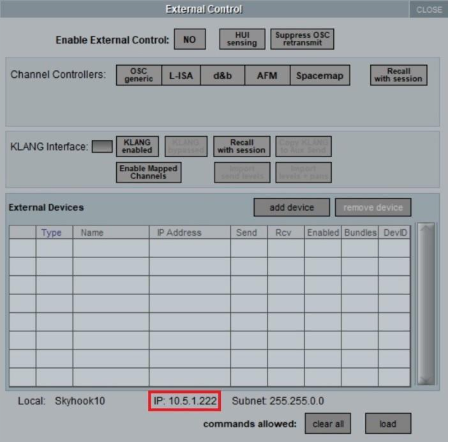
Note: If the IP Address displays 0.0.0.0, navigate to Options > Console, to confirm Enable Console Network is set to YES and the correct network adapter is selected.
3. Establish the network link between the Astral ARX32/ARX16 and a Quantum or SD DiGiCo console.
- From the Main Menu of the Astral Series receiver, navigate to System > Macros > DiGiCo Console List.
- Select the Add button to enter the DiGiCo console’s IP address and select Save. In this example, it is 10.5.1.222.

Notes
- An AstralComm network can consist of up to ten Astral ARX16 and or Astral ARX32 receivers (standalone or in RF Mirror Mode) and ten DiGiCo SD or Quantum consoles.
- When working with DiGiCo consoles with dual engines, add the IP address for each engine to the console list. Only the “active” engine will listen to the received AstralComm commands.
- In the External Control window of the DiGiCo console, click the Enable External Control button so it turns to YES.
- Select the button add device under External Devices and choose Astral from the drop-down menu.
- Once added to the External Devices list, enter the Astral Series receiver’s control IP address. In this example, the Control IP address is 10.5.1.89
- Confirm the DevID if using multiple external devices. ]
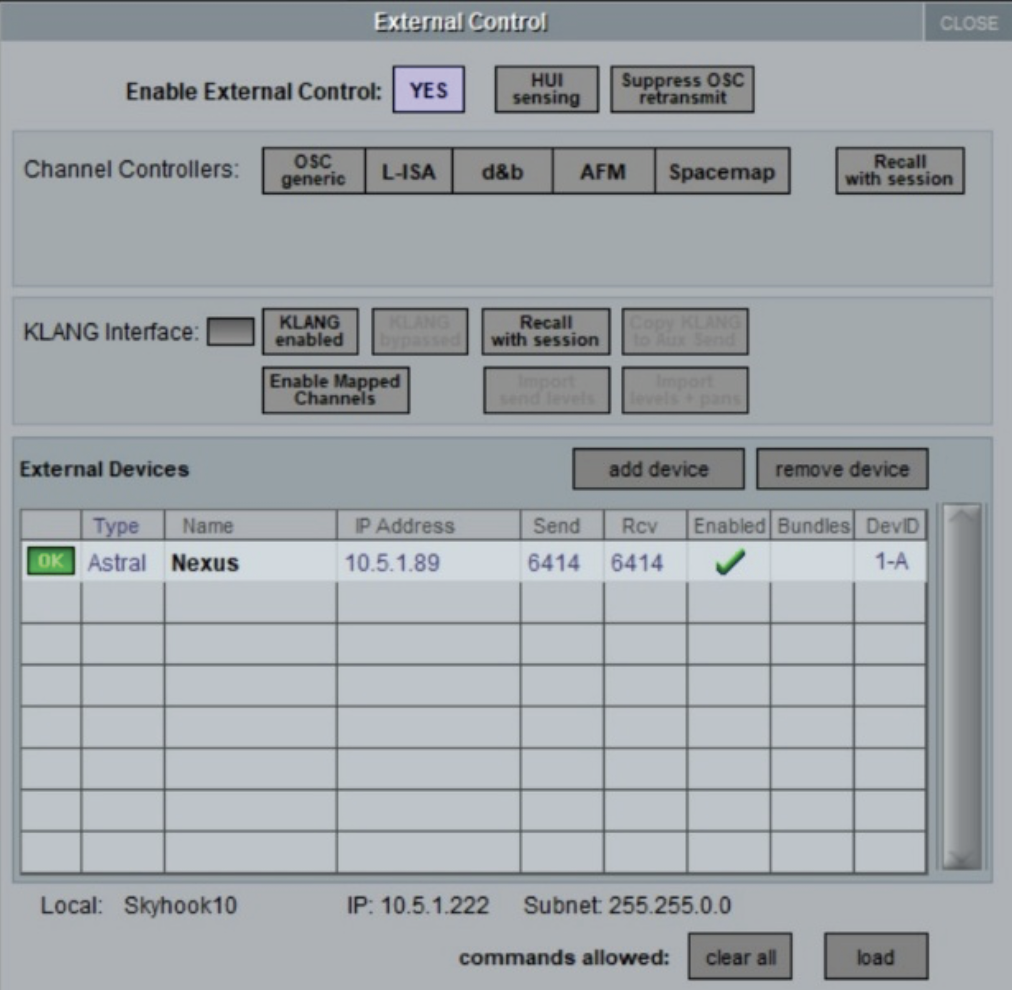
- Select Enabled on the Astral Series receiver in the External Devices list.
- If the link is successful, the device will display OK in green on the list.
4. From the Astral Series receiver 1RX view of the channel to trigger the command, select the gear icon.
- From this menu, confirm the Control Ring Type for the transmitter triggering the commands matches the installed option on the transmitter.
- Assign the transmitter Button to Mute, Rec, Aux Hold, Aux Latch, Power, GPIO, RF, or PTT to activate the button.
Notes:
- If the Button is assigned to None, the button is disabled and will not trigger Astral commands.
- If the Astral Series Transmitter is in the off state or if RF is muted, Astral commands will not be triggered.
5. From the Main Menu of the Astral Series receiver, navigate to System > Macros and select Add New Macros. Create new Macros by defining the following parameters.

Name: Macro Name
Source: Selects which receiver channel or TX Group is the source for the macro command.
Options include:
- RX Channel Number (1-n, where ‘n’ is the number of available RX channels installed).\
- TX Group Number (1-8)
- All TX Group
- RF Mirror
Condition: To send a command from the selected source, choose the paired transmitter button action, transmitter control switch position, transmitter state, or Astral ARX16/ ARX32 action that should trigger it.
a. Transmitter Button Actions (Applies to the Astral HH Control Ring buttons)
- [Button-L, Button-C, or Button-R] Release
- [Button-L, Button-C, or Button-R] Press/Release
b. Transmitter Control Switch Position (Applies to Astral HH Control Ring Switch & Astral TX Switch)
- [Control Switch] On/Off
- [Control Switch] On
- [Control Switch] Off
c. Transmitter State (Sends the command when the ARX16/ Astral ARX32 receives confirmation that the transmitter state is true)
- TX Power, TX Mute, TX Record, or TX RF] is On
- [TX Power, TX Mute, TX Record, or TX RF] is Off
d. Astral ARX16/ Astral ARX32 Action (Sends the command immediately when the Astral ARX16/ ARX32 initiates the action from its interface or the web app. It does not wait to receive confirmation from the transmitter)
- Initiate [TX Power, TX Mute, TX Record, or TX RF] On
- Initiate [TX Power, TX Mute, TX Record, or TX RF] Off
- [TX Group 1-8 Power, TX Group 1-8 Mute, TX Group 1-8 Record, or TX Group 1-8 RF] On
- [TX Group 1-8 Power, TX Group 1-8 Mute, TX Group 1-8 Record, or TX Group 1-8 RF] Off
- [All TX Group Power, All TX Group Mute, All TX Group Record, or All TX Group RF] On
- [All TX Group Power, All TX Group Mute, All TX Group Record, or All TX Group RF] Off
Command ID: Range: None, 1 to 256. The Command ID must correspond with the DiGiCo console Macro’s Command ID otherwise the console macro will not be activated
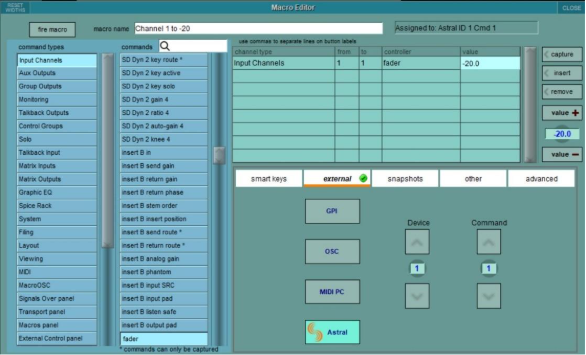
6. From the DiGiCo Master Screen, navigate to Setup > Macros.
- Select new to add a new macro.
- Define the parameters of the Macro in the Macro Editor. Refer to the consoles user’s manual for more information on Macros.
- To trigger the Macro from an AstralComm command, in the Macro Editor, select external.
- Confirm Astral is selected and Define the Device and Command ID to match the Astral Series receiver.
Macros and RF Mirror Mode
Macro commands created on a Primary Astral ARX16/ ARX32 are mirrored to a Secondary unit when RF Mirror Mode is activated. Based on whether the DiGiCo Console List is set to be mirrored or not, the system can be configured so that both units send macro commands, or only the active unit sends macro commands.
Select Network > RF Mirror Mode, then turn on or off the ‘Mirror DiGiCo Console List’ setting as follows:
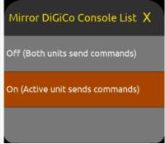
- On = Only the active unit (Primary or Secondary) sends the macro commands. This is typically used in single console applications.
- Off = Both Primary AND Secondary units send the macro commands. This is typically used in scenarios where Primary and Secondary Astral ARX16/ ARX32 are each feeding their own consoles.
Note:
- When entering Mirror mode on the Secondary unit, the following message will appear:
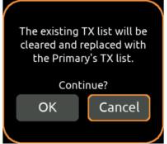
- Selecting OK will clear the TX list of the Secondary unit and replace it with the Primary unit’s TX list.